A CI/CD pipeline with GitLab and Kubernetes - the simple way
23 Dec 2020
To speed up the development process for a new project, we were investigating the possibility to integrating our Kubernetes (k8s) cluster into our GitLab instance. It turned out, that all of the examples and tutorials we found were either way to complicated (examples repos, Medium articles), or not helpful at all because they omitted crucial parts (the GitLab documentation on deployment). So we decided to write an up-to-date tutorial.
This tutorial will cover how to integrate a running k8s cluster into GitLab (as a cluster not managed by GitLab), how to install the runner and, most importantly, how to write a .gitlab-ci.yml file which builds a Docker image, pushes it into the GitLab Container registry and does the deployment. What we will not cover, is the installation of the cluster or of the GitLab instance.
Do not fear, it is much easier than you think!
Disclaimer: we do not take any responsibility for bricked GitLab instances or k8s clusters!
Requirements
- An up and running Kubernetes cluster and admin rights on it.
- A current installation of GitLab (tested on 13.6 and 13.7) and a user with Admin permissions.
- GitLab must be able to reach the Kubernetes API port.
- An example project to build and deploy on the cluster with an initial k8s deployment ready (we will also provide an example deployment yaml for k8s if you shouldn’t have one).
Connecting GitLab with the k8s cluster
The first step is to enable GitLab to speak with our k8s cluster.
The following steps assume you are suing GitLab 13.6 or 13.7.
- First go to the Admin area in your GitLab instance and the navigate to the Kubernetes section.
- Click on Connect cluster with certificate.
- Switch to the Connect existing cluster tab.
- Enter your desired name for the cluster. This name will be used through GitLab to identify the cluster.
- (Optional) specify which Environment scope the cluster is used for. This lets you split testing/staging/production environments into separate k8s cluster. Keep the default “*” if you are unsure.
- Enter the API URL. It usually has the form
https://some_host_name_or_address:6443. - On your k8s cluster type
kubectl get secretsand find the line with the name of your default token. It has the form ofdefault-token-<something>. - Enter
kubectl get secret default-token-<something> -o jsonpath="{['data']['ca\.crt']}" | base64 --decodewhere you replace default-token-<something> with what you found with the command above.
- You should get an output like that:
 -----BEGIN CERTIFICATE-----
 A LOT OF CHARACTERS
 -----END CERTIFICATE-----
Copy the whole output (including the “—” lines) and past it into the CA Certificate field.
- Now we have to create a service account for GitLab on the cluster. Create a file gitlab-admin-service-account.yaml with the following contents:
  apiVersion: v1
  kind: ServiceAccount
  metadata:
  name: gitlab
  namespace: kube-system
  ---
  apiVersion: rbac.authorization.k8s.io/v1beta1
  kind: ClusterRoleBinding
  metadata:
  name: gitlab-admin
  roleRef:
  apiGroup: rbac.authorization.k8s.io
  kind: ClusterRole
  name: cluster-admin
  subjects:
  - kind: ServiceAccount
  name: gitlab
  namespace: kube-system
and type
kubectl apply -f gitlab-admin-service-account.yamlto apply it. The expected output is
serviceaccount "gitlab" created clusterrolebinding "gitlab-admin" created - Type
kubectl -n kube-system describe secret $(kubectl -n kube-system get secret | grep gitlab | awk '{print $1}')to get the token for that newly created account. Paste everything from the token key into the Service Token field.
- Unselect GitLab-managed cluster because we do not want GitLab to manage the cluster.
- Finally click on Add Kubernetes cluster and GitLab should now be able to talk to k8s.
Install the GitLab Runner onto the k8s cluster
This step is easy: Go to Admin Area - Kubernetes and click on your clusters name. On the Applications tab search for GitLab Runner and click Install. After a few seconds you should have an installed and fully integrated shared runner in your GitLab instance.
Writing a GitLab CI/CD configuration for deployment on the k8s cluster
For the next step you need an example project which you can pack into a Docker image and deploy on your cluster. Because we want to manage our deployments and yaml files for k8s in a separate repository, We usually create the deployment for the application once by hand and use GitLab to modify the deployment to roll out the newest version of the application.
Creating the initial deployment from a yaml file
The following snippet is a deployment declaration for a simple, generic application. We omitted all the additional things you may need, like service or ingress, because this would be beyond the scope of this article.
apiVersion: apps/v1
kind: Deployment
metadata:
  name: my-app
  namespace: my-app-namespace
spec:
  replicas: 1
  selector:
    matchLabels:
      app: my-app
  template:
    metadata:
      labels:
        app: my-app
        name: my-app
    spec:
      containers:
      - image: myapp:latest
        name: my-app
This assumes there is a namespace my-app-namespace were you can deploy to and that it does not need image pull secrets (see https://kubernetes.io/docs/tasks/configure-pod-container/pull-image-private-registry/ if you should need that).
After applying this deployment, we are good to go to create the CI/CD pipeline (the central part of this article).
Creating a CI/CD GitLab pipeline including k8s deployment
In contrast to all the examples we found, it is very easy to deploy a new version via a CI/CD pipeline if you have a GitLab integrated k8s cluster, because GitLab will provide the pipeline will the necessary credentials to deploy to the cluster.
stages:
  - build_image
  - deploy

create_docker_image:
  stage: build_image
  image:
    name: gcr.io/kaniko-project/executor:debug
    entrypoint: [""]
  script:
    - mkdir -p /kaniko/.docker
    - echo "{\"auths\":{\"$CI_REGISTRY\":{\"username\":\"$CI_REGISTRY_USER\",\"password\":\"$CI_REGISTRY_PASSWORD\"}}}" > /kaniko/.docker/config.json
    - /kaniko/executor --context $CI_PROJECT_DIR --dockerfile $CI_PROJECT_DIR/Dockerfile --destination $CI_REGISTRY_IMAGE:$CI_COMMIT_SHA

deploy_production:
  stage: deploy
  when: manual
  dependencies:
    - create_docker_image
  image:
    name: bitnami/kubectl:latest
    entrypoint: [""]
  environment:
    name: production
    url: https://my-app.com
    kubernetes:
      namespace: my-app
  script:
    - kubectl set image deployment/my-app my-app=$CI_REGISTRY_IMAGE:$CI_COMMIT_SHA
    - kubectl rollout status deployment/my-app --timeout=10s
This pipeline definition contains two very useful examples: The first is how to build a Docker image without Docker-in-Docker, Docker-from-Docker or any bare metal Docker installation and without any superuser rights. The awesome kaniko project provides a Docker compatible way to build Docker image from a Dockerfile inside a k8s cluster without compromising security. Here it is used to build the image for our application and to automatically push it into the GitLab Container registry.
The second part is the deployment part. We are using the bitnami/kubectl image which provides us with the kubectl command. The actual deployment is just two lines! How is that possible? Well, in contrast to many of the examples we found, you do not need to worry about the k8s connection and credentials anymore, because GitLab provides a fully working KUBECONFIG as environment variable and kubectl will automatically use this to connect to the cluster. GitLab will also make sure, that you are only modifying the namespace which is defined in the environment section of your yaml file. If you should need to modify deployments in other namespaces, you will have to go through the ordeal of providing your own credentials for the cluster.
Feel free to omit the second script line or increase the timeout. It is a useful command to make sure the pipeline fails when the deployment fails. If you are using a lot of replicas, large images or other settings which would make the rollout much slower, you will have to increase the timeout or the pipeline step will fail.
Running the pipeline
When you push something to the project repository, the first part, creating the Docker image, will always run. The second part, the deployment is marked as manual, i.e., it has to be triggered by hand via GitLab (Fig. 1). This is useful for production deployments. For testing you could automatically deploy, if you want.
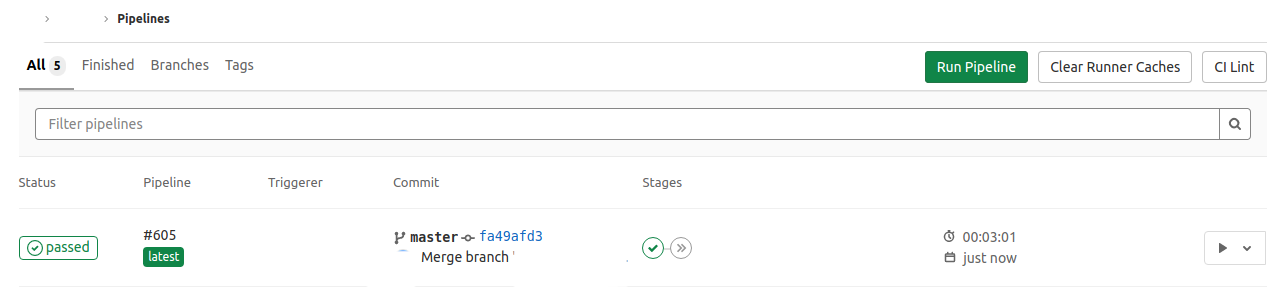
Figure 1: Finished first step of the pipeline, building the Docker image.
To start the deployment click on the Play symbol on the right hand side and then select the stage you want to run. In our case this is “deploy_production” (see Fig. 2). This will start the deployment on the cluster.

Figure 2: Starting the deployment.
The output of the job should look similar to the output in the following image (Fig. 3).
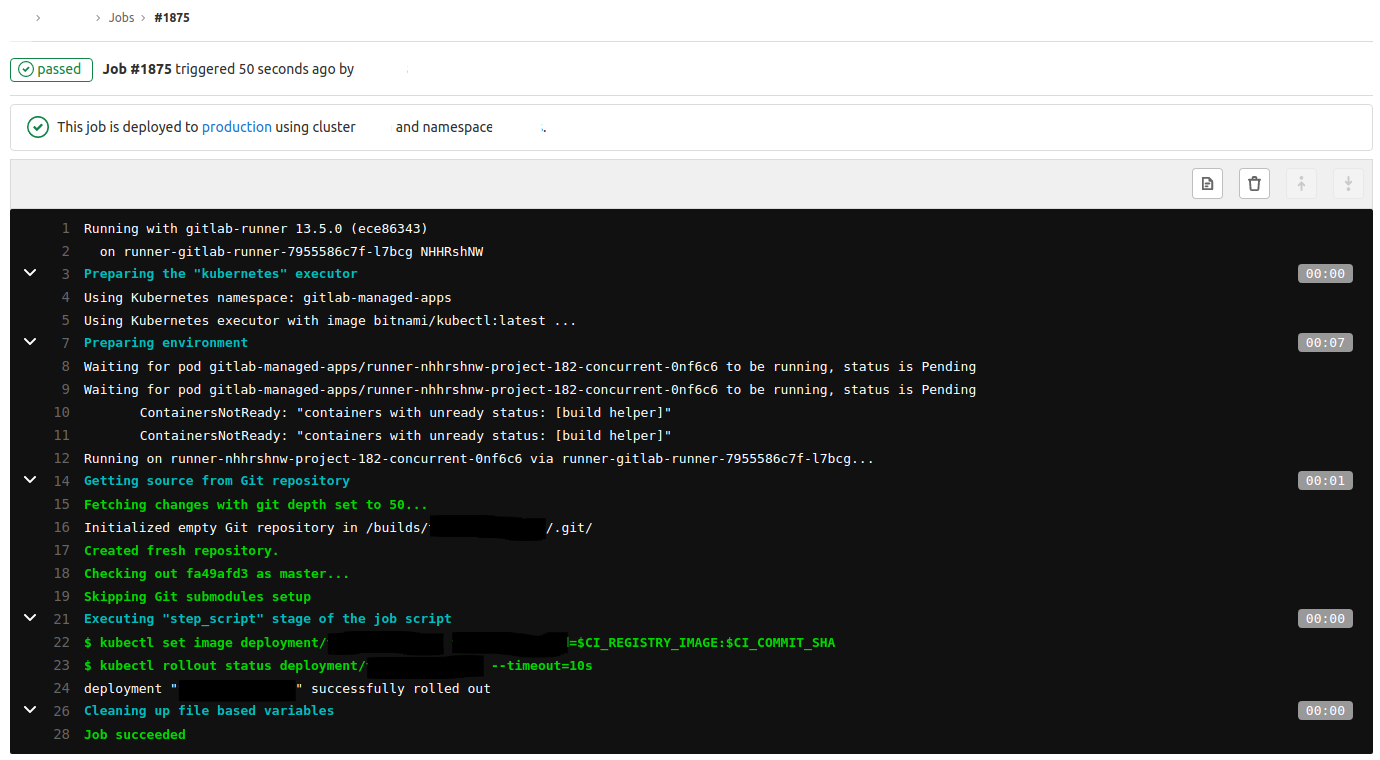
Figure 3: Deployment job output.
Summary
We have shown how to integrate an existing k8s cluster into GitLab and how to use it for building and deploying an application. In contrast to many believes, this is much easier than doing it, for example, on a bare metal Docker installation. K8s already has a lot of advantages and together with GitLab it becomes very simple to automate deployments and build complete CI/CD pipelines.
⇐ Back